|
|
|
License
GemCutter
Downloads
Documentation
Quick StartUser Guide
Templates
Compiling Bee
Developer Guide
Slides (French)
Project
GIT RepositoryReleases
Contributors
Source API
Test Coverage
Bugs
User Guide
This file is the reference documentation for bee users. For a short introduction to bee, please see Quick Start documentation.
Installation
Bee is written in Ruby, thus a Ruby Virtual Machine must be installed to run it. You can get one for free at http://www.ruby-lang.org. You must also install RubyGems to install Bee and its dependencies.
When Ruby and Gems are both installed, you can install Bee and its
dependencies typing gem install bee. You might need
administrator privileges to do so. You can test your installation
typing bee -h.
Bee has been tested on MacOSX (Tiger 10.4.11 and Leopard 1.5.6), Linux (Ubuntu 7.10 and Mint Helena) and Windows (XP SP2) for Ruby versions 1.8.6-p36 (with gems 0.9.4), 1.8.6-p111 (with gems 1.0.1), 1.8.6-p114 (with gems 1.0.1), 1.8.7-p72 (with gems 1.3.0) and 1.9.1-p376 (with integrated Gems). Thus it should run on most modern operating systems and Ruby VMs.
If you have trouble installing Ruby VMs and Gems, please refer to Compiling Bee page for more information on these topics.
Usage
To run a build, type bee. This will run default target, that is the one specified in default key of the build entry. To run another target, pass its name on the command line. Thus, to run target foo, type bee foo. You can run more than one target at once, passing their name. Typing bee foo bar will run target foo, then target bar (even if it was already executed running foo).
Let's consider following build file:
- build: hello
  default: hello
  description: Example Hello World build file

- properties:
    user_name: "#{ENV['USER']}"

- target: capitalize
  description: Capitalize user name
  script:
  - rb: "user_name.capitalize!"

- target: hello
  depends: capitalize
  description: Say hello to user
  script:
  - print: "Hello #{user_name}!"
Running build with command bee will run target all (default one) and produce following output:
$ bee
------------------------------------------------------------------ capitalize --
----------------------------------------------------------------------- hello --
Hello Casa!
OK
This output indicates running targets (capitalize and hello in this case). Terminating OK indicates that no error was met and thus build is OK. If an error occurs, build ends with an error message and bee process exits with an error value.
Build file name defaults to build.yml in current directory. You may override this default value using -f file option. Thus, to run build file other.yml, type bee -f other.yml. You can also look for build file recursively in file system using -r option. So, typing bee -r will look for build file named build.yml in current directory. If no build file was found, it will look in parent directories recursively. Build fails if no build file was found. You can use -r and -f file options at the same time to search an alternate file recursively.
To produce verbose output running builds, use -v option. This will write build file used, executed tasks and execution time. Furthermore, this will output a stack trace (in addition to standard error message) when an error takes place, which is useful to debug Bee itself. Running previous build with verbose output would print:
$ bee -v
Starting build 'exp/userguide-build.yml'...
------------------------------------------------------------------ capitalize --
- rb: user_name.capitalize!
----------------------------------------------------------------------- hello --
- print: "Hello #{user_name}!"
Hello Casa!
Built in 0 s
OK
The -n option produces the same verbose output but doesn't actually runs tasks, it just prints them.
To print help on usage, type bee -h. This outputs:
$ bee -h
Usage: bee [options] [targets]
-V             Print version and exit.
-h             Print help about usage and exit.
-b             Print help about build and exit.
-n             Don't actually run any commands; just print them.
-k task        Print help about tasks in a package (writing "foo.?") or a
               given one (writing "foo.bar") and exit.
-e egg         Print help about templates in a given package (writing
               "foo.?") or a given one (writing "foo.bar") and exit.
-p name=value  Set a named property with a given value.
-t egg         Run a given egg to generate a template project.
-v             Enable verbose mode.
-s style       Define style for output (see documentation).
-c             Use color scheme for output (if running in color terminal).
-w             Use black and white output (default).
-f file        Build file to run (defaults to "build.yml").
-r             Look for build file recursively up in file system.
-l             Print bee logo on console.
-R resource    Print given resource (such as ':bee:clean.yml') on console.
-a             Print list of available targets.
-o             Print list of available options.
-x             Print list of available tasks.
-y             Print list of available templates.
targets        Targets to run (default target if omitted).
To print help on build file, use -b option. This will output build name and description, property names and values, target names and descriptions and default target. For our sample build file, this will print:
$ bee -b
build: hello
description: Example Hello World build file
properties:
- base: "/home/casa/tmp/bee/doc/exp"
- here: "/home/casa/tmp/bee/doc"
- user_name: "casa"
targets:
- capitalize: Capitalize user name
- hello: Say hello to user [capitalize]
default: hello
To get help on a given task, type bee -k task. Thus, to get help about print task for instance, you would type:
$ bee -k print
----------------------------------------------------------------------- print --
Alias for echo.

Print a message on console. If message is not a string, this task
outputs the inspected value of the object.

- message: message to print.

Example

 - echo: "Hello World!"
To get help about all tasks, type bee -k ?. To get help about all tasks in package foo, type bee -k foo.?.
To get help on templates, use the -e template option, with the same joker syntax than for task help. Thus, to get help about the package template, type bee -e package, which will output:
$ bee -e package
----------------------------------------------------------------- bee.package --
This script will create a project for a bee package with sample task (in
'lib' directory) and template (in 'egg' directory). A unit test for the
task is generated in 'test' directory. Generated build file has a target
'test' to run unit tests, a target 'gem' to generate a gem archive, a
'clean' target to clean generated files and a 'install' target to build
and install gem.
You can run a given template using option -t template. Templates are a way to quickly start a new project from scratch. They are quite comparable to Rails scaffoldings. For more information on using and developing templates, please see section Template Project of Developer Guide.
You can set text properties on command line with option -p foo=bar, setting property foo with value "bar". You can set more than one property this way. For instance, launching following empty build file with command line bee -b -p foo=1 bar=2:
- target: test
Will output:
$ bee -b -p foo=1 -p bar=2
properties:
- bar: 2
- base: "/home/casa/tmp/bee/doc/exp"
- foo: 1
- here: "/home/casa/tmp/bee/doc"
targets:
- test
When you run bee in a color terminal (such as the Terminal application on MacOSX or XTerm on Linux), you can get a colorized output using -c command line option. This will use the standard color scheme for bee. To customize your output, you can apply a style to output using -s style option. In the terminal bellow, we run a build with default black and white style and then applying the default color style:
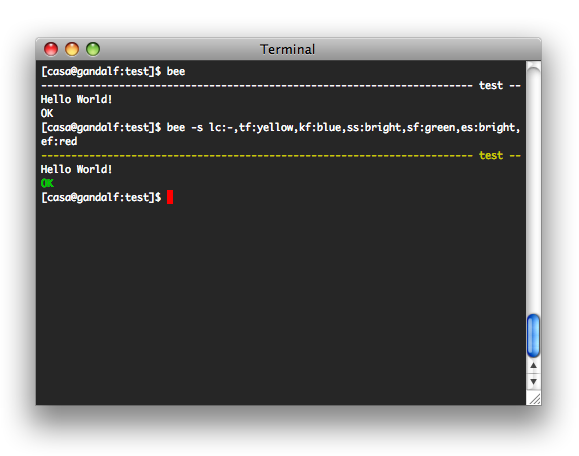
Style are applied outputting ANSI colors and styles for Unix terminals and thus won't run on Windows machines. Styles are defined as coma separated key/value pairs. Keys are the following:
| Key | Description |
|---|---|
| lc | Character for target title (defaults to dash -). To set space,
set to an empty value, such as: ...,lc:,... as there should
not be spaces in style option (this would break command line parsing). |
| ll | Line length. If not set, will try to determine it calling IOCTL function. If this call fails, will set line length to 80 characters. |
| ts | Target style. |
| tf | Target foreground. |
| tb | Target background. |
| ks | Task style. |
| kf | Task foreground. |
| kb | Task background. |
| ss | Success style. |
| sf | Success foreground. |
| sb | Success background. |
| es | Error style. |
| ef | Error foreground. |
| eb | Error background. |
Possible foreground and background colors are the following ones: black, red, green, yellow, blue, magenta, cyan and white. Styles are the following ones: bright, dim, underscore, blink, reverse and hidden.
If a given key is not set, it will keep its default value. The Bee
options environment variable BEEOPT is the best place
to set you style settings (see section
Configuration hereafter). Note that you
can force black and white output using the -w options. This
is useful to run bee in a software that doesn't manage ANSI color codes
while color is set in your BEEOPT environment variable.
You can print the Bee logo on command line with option -l:
$ bee -l
        _
       | |__   ___  ___
 ____  | '_ \ / _ \/ _ \  _____ _____ _____ _____ _____ _____ _____ _____ _____
|____| | |_) |  __/  __/ |_____|_____|_____|_____|_____|_____|_____|_____|_____|
       |_.__/ \___|\___|  0.12.2                       http://bee.rubyforge.org

------------------------------------------------------------------ capitalize --
----------------------------------------------------------------------- hello --
Hello Casa!
OK
On Unix platforms, you can enable Bee completion in the terminal. To do so, you must copy the script bash_completion_bee (that you will find in the bin directory of the gem, use commands sudo updatedb and locate bash_completion_bee to locate it in your file system) or download it from http://sweetohm.net/bee/downloads/bash_completion_bee) in directory /etc/bash_completion.d/, rename it bee and make it executable (with command sudo chmod +x /etc/bash_completion.d/bee).
Then add the following lines in your shell startup file (that is ~/.profile, ~/.bashrc or such a configuration file):
# Bee completion
. /etc/bash_completion.d/bee
Next time you open a terminal, completion should have been enabled for long options (starting with --), build target names, help about tasks and templates:
$ bee --help[TAB]
--help           --help-build     --help-task      --help-template

$ bee t[TAB]
tag   test

$ bee -k c[TAB]
cat    cd     chmod  chown  copy   cp

$ bee -e s[TAB]
script   sinatra  source
On MacOSX, bash doesn't have completion feature out of the box. Thus, you will have to install bash_completion yourself. You may use Fink (typing fink install bash-completion) or MacPorts (typing port install bash_completion) for that purpose. To get more information about installation bash_completion on MacOSX, please visit this page.
Configuration
Bee doesn't load configuration file at startup, but you can set
command line options in environment variable BEEOPT that
is appended on command line at startup. For instance, setting:
BEEOPT="-v"
Would always run Bee in verbose mode.
Build files
Let's consider following simple build file:
- build: hello
  default: hello
  description: Example Hello World build file

- properties:
    user_name: "#{ENV['USER']}"

- target: capitalize
  description: Capitalize user name
  script:
  - rb: "user_name.capitalize!"

- target: hello
  depends: capitalize
  description: Say hello to user
  script:
  - print: "Hello #{user_name}!"
This is a YAML file and thus follows standard YAML syntax. We won't detail the YAML syntax hereafter but instead see a useful subset to write Bee build files.
Build file syntax
You might think of YAML as a data aware text file format. Let's see a grocery list in YAML:
- spam
- eggs
- coffee
Let's write a short Ruby script that would load this file and print loaded data:
require 'yaml'

object = YAML::load(File.read(ARGV[0]))
puts object.inspect
Let's run this script passing our grocery list on command line:
$ ruby userguide-yaml-loader.rb userguide-yaml-list.yml
["spam", "eggs", "coffee"]
We see that the script loads this file as a Ruby list of strings. Thus, writing a list with dashes (as we would do for our grocery list) results in a list while loaded.
Let's write a list with associated quantities:
spam: 1
eggs: 2
coffee: 1
Let's run our script on this file:
$ ruby userguide-yaml-loader.rb userguide-yaml-hash.yml
{"spam"=>1, "coffee"=>1, "eggs"=>2}
This results in a Ruby Hash! Note that there are short syntax for list and hash, that happens to be very close to Ruby (and Python) syntax:
- short-list: [spam, eggs, coffee]
- short-hash: {spam: 1, eggs: 2, coffee: 1}
But YAML is also aware of data types: in our hash, strings are associated to integers. When we write an integer, YAML parser recognizes it and returns an integer instead of a string. YAML is also aware of floats, booleans, dates and symbols. For instance:
- string
- 123
- 3.14
- true
- 2007-06-18T09:27:00+02
- :symbol
- null
Would be parsed as:
$ ruby userguide-yaml-loader.rb userguide-yaml-data-types.yml
["string", 123, 3.14, true, Mon Jun 18 09:27:00 +0200 2007, :symbol, nil]
You might wonder how we can write string 123 as it would be recognized as an integer. In this case, you can force string type using quotes, writing "123". The form without quotes is a convenient way to write YAML strings. Note also that null is parsed into nil and thus is not a valid name for targets.
Now, you might ask how to nest a structure within another one. This is done with indentation. For instance, to write a list within another one, you might write:
- item 1
-
  - nested item 1
  - nested item 2
- item 2
This will be parsed into:
$ ruby userguide-yaml-loader.rb userguide-yaml-nested-list.yml
["item 1", ["nested item 1", "nested item 2"], "item 2"]
Here is hash nested in a list:
- item 1
- foo: 1
  bar: 2
- item 2
That will be parsed into:
$ ruby userguide-yaml-loader.rb userguide-yaml-nested-hash.yml
["item 1", {"bar"=>2, "foo"=>1}, "item 2"]
This YAML syntax is very powerful, yet simple. This enables to write complicated data structures in a human readable form. We'll now see how it is used to write build files.
A build file is a list of entries. An entry might be of the following type:
- Information: this is a hash that gives general information about the build (such as its name or default target).
- Properties: this is a hash for build properties.
- Targets: this is the list of build targets.
Let's detail each entry type.
Build information
Let's see a sample build information entry:
- build: test
  extends: parent.yml
  abstract: false
  default: all
  description: Sample build
  context: build.rb
This entry is a hash with following keys:
- build: this mandatory key gives the build name (which will generally be the name of the project to build).
- extends: parent build file(s) to extends. See section Build inheritance for more information on this topic.
- abstract: tells if this build file is abstract, which means that it must be extended to run. This entry is optional and defaults to false.
- default: this optional key is the default target (or a list of default targets), that is the target(s) to run when no target is given on the command line. If there is no such entry, you must pass target to run on the command line.
- alias: aliases for targets, as a map that associates an alias to a target or a list of targets. Note that aliases are valid target names when passed on command line or listed in default entry, but they are not existing targets. Thus, you can't depend on them from another target for instance.
- description: this optional key describes the build.
- context: this optional key is a file (or list of files) to load in the build context (see Build context section hereafter for more information). This path might be absolute or relative to the build file directory.
This entry is optional but you can't have two of them in a given build file.
Build properties
This is a hash of build properties, such as in this build file:
- properties:
    spam: 1
    eggs: 2
    coffee: 1
Properties are a hash made of name / value pairs. The name must be a valid Ruby variable name and must not collide with a function in the Ruby context. For instance, following build file:
- properties:
    12three: 123

- target: test
  script:
  - print: "12three: #{12three}"
Will result in a parsing error because evaluating Ruby expression 12three = 123 will output:
$ ruby -e '12three = 123'
-e:1: syntax error, unexpected tIDENTIFIER, expecting $end
12three = 123
       ^
While loading build file, properties are evaluated as Ruby expressions in the build context. Thus, a property such as foo: 123 will result in evaluating foo = 123 in the build context.
Strings are also evaluated as Ruby strings, thus they can refer to other variables (using Ruby #{variable} syntax), or any Ruby expression, such as in this build file:
- properties:
    foo: "foo"
    bar: "#{foo}bar"
    upcase: "#{foo.upcase}"

- target: test
  script:
  - print: "foo: #{foo}"
  - print: "bar: #{bar}"
  - print: "upcase: #{upcase}"
Will output:
$ bee test
------------------------------------------------------------------------ test --
foo: foo
bar: foobar
upcase: FOO
OK
You can refer to another variable using symbol notation. For instance, in this build file:
- properties:
    foo: "foo"

- target: test
  script:
  - print: "#{foo}"
  - print: :foo
We refer to value of build property foo using symbol :foo instead of using the string evaluation. The result is the same for strings but not for other property types.
Property values are not limited to strings. You might assign any YAML data type to a build property. This might be useful when using these properties in Ruby scripts or Bee tasks that expect a given type (such as lists for instance).
It is also possible to load properties from a YAML file containing a list of properties to set. You would define such a properties file as following:
foo: 123
bar: test
You would load these properties such as in:
- properties: userguide-properties.yml

- target: test
You give the absolute or relative (to the build file directory) path to the properties file. Printing help on this build file would output:
$ bee -b
properties:
- bar: "test"
- base: "/home/casa/tmp/bee/doc/exp"
- foo: 123
- here: "/home/casa/tmp/bee/doc"
targets:
- test
Which shows that properties we define in our YAML properties file were set in the build context.
Note that if you define a given property twice in your build file, the last value will be kept. Properties you pass on command line (with option -p) overwrite build file properties and are defined after build file loading.
Default properties
When running, Bee automatically defines two properties:
- base which is the directory of the build file.
- here that is the directory where Bee was started.
Following build file:
- target: defaults
  script:
  - print: "base: #{base}"
  - print: "here: #{here}"
Outputs (depending of the directory you're running script into):
$ bee defaults
-------------------------------------------------------------------- defaults --
base: /home/casa/tmp/bee/doc/exp
here: /home/casa/tmp/bee/doc
OK
These properties are useful to get an absolute path for a file in your project. For instance, absolute path for file lib/bee.rb relatively to your build file may be obtained with property abs_path = "#{base}/lib/bee.rb". Note that base and here might have different values. Furthermore, these two property names are reserved for Bee usage and you can't name your own properties base or here.
Build targets
A build target is a hash with following keys:
- target: mandatory key that defines the target name.
- depends: a target (or list of targets) this target depends on (optional).
- description: description of the target purpose (optional).
- script: list of tasks to run to perform this target (optional).
Here is a sample build file with two targets:
- target: test
  depends: hello
  description: "Test target"
  script:
  - print: "This is a test"

- target: hello
  description: "Say hello"
  script: 'echo "Hello!"'
This will output:
$ bee test
----------------------------------------------------------------------- hello --
Hello!
------------------------------------------------------------------------ test --
This is a test
OK
It runs first target test as there is no default target (no build information entry is defined) and target test is the first one of this build file. But this target depends on hello, thus it runs hello then test. You can tell Bee to run a given target passing its name on the command line. Thus, to run target hello, you can type:
$ bee hello
----------------------------------------------------------------------- hello --
Hello!
OK
Note that you can't define two targets with the same name. If so, Bee will complain about duplicate target definition.
depends key may also be a list. In this case, all depending targets will run first. Note that a given target won't run twice, if already executed, it will be skipped.
script key is a task or list of tasks to run to perform this target. A task may be:
- Shell Task: This is a shell script that will be executed in directory of the build file.
- Ruby Task: This is a Ruby script that will be evaluated in the context of the build in the directory of the build file.
- Bee Task: This is a task written in Ruby that can be called using a YAML syntax.
Shell tasks
Shell tasks are shell scripts in strings. For instance, to output Hello World!, one might write:
- target: test
  script:
  - 'echo "Hello World!"'
Each shell script runs in its own process, thus following build file:
- target: test
  script:
  - 'WHO="World"'
  - 'echo "Hello ${WHO}!"'
Might not output what you expect:
$ bee test
------------------------------------------------------------------------ test --
Hello !
OK
This is because second line of script runs in another process than the first one, thus it doesn't old any value for environment variable WHO. To implement expected behavior, you should write:
- target: test
  script:
    - |
      WHO=World
      echo "Hello ${WHO}!"
Which will define the script in a single string and run it in a single process, keeping value you assigned to the environment variable and thus behave as expected:
$ bee test
------------------------------------------------------------------------ test --
Hello World!
OK
You can access build properties in shell scripts using the Ruby notation:
- properties:
    who: "World"

- target: test
  script:
  - 'echo "Hello #{who}!"'
While running a shell script, Bee replaces strings #{expression} with the result of the expression evaluation in the build context. Thus, you can use a Ruby expression instead of a simple string reference. For instance, to get the uppercase value of string who, one might write:
- properties:
    who: "World"

- target: test
  script:
  - 'echo "Hello #{who.upcase}!"'
This will output:
$ bee test
------------------------------------------------------------------------ test --
Hello WORLD!
OK
These shell tasks are convenient, but you should keep in mind that they bind your build with a given operating system. To make your build independent of any platform or OS, you should use instead Ruby or Bee tasks we'll see now.
Ruby Tasks
They are pieces of Ruby scripts embedded in your build file and evaluated in the build context. In this context live build properties and scripts you loaded in the build context using the context key of the build entry of the build file (see section Build context hereafter for more details).
For instance, to print the list of targets for a given build file, one might write following build file:
- properties:
    file: userguide-ruby.yml

- target: print
  depends: targets
  script:
  - rb: "puts targets"

- target: targets
  description: Get build targets
  script:
  - rb: |
      entries = YAML::load(File.read(file))
      targets = entries.collect{|entry| entry['target']}.compact!
That will print:
$ bee print
--------------------------------------------------------------------- targets --
----------------------------------------------------------------------- print --
print
targets
OK
Note that when we change directory in a given Ruby task, this directory will stay current one until the end of the current target. Furthermore, you can access build properties because they are local variables for your Ruby script. The same way, all local variables you define in your script are build properties. Thus, you must be careful to avoid collisions with properties, using prefixed names for local variables you don't want to expose as properties, such as _foo.
Ruby tasks are not the right place for long ruby scripts because you are writing these scripts in a YAML file, you won't probably benefit from your editor's facilities for editing Ruby files. Furthermore, long Ruby tasks may make your build files less readable. Thus, you should put long ruby scripts in a separate Ruby source file and load it in the context key of the build entry of your build file.
Bee tasks
These tasks are coded in Ruby and called using a YAML syntax. We have already seen print task that prints a message on the console:
- properties:
    who: "World"

- target: hello
  script:
  - print: "Hello #{who}!"
This will output:
$ bee hello
----------------------------------------------------------------------- hello --
Hello World!
OK
There are Bee tasks for many common tasks to build a project. To get help on usage of these tasks, please see Tasks Reference section of the documentation.
These tasks are the best solution to write platform and OS independent build files. You can write your own tasks in Ruby, see section Writing Bee Tasks in Developer Guide for more information on this topic.
Control Structures
In addition to tasks, a target can include control structures such
as if, while or for to control
tasks execution.
If construct
If construct will evaluate the Ruby expression in the if
entry and run block in the then entry or else
entry accordingly.
if: the condition to evaluate. This is a Ruby expression evaluated in the build context.then: block that is evaluated if confition in if is true.else: block that is evaluated if confition in if is false.
For instance, to test hardware platform, you might write:
- target: hardware
  script:
  - if: RUBY_PLATFORM =~ /darwin/
    then:
    - print: Hello, I'm a Mac
    else:
    - print: Hello, I'm a PC
Which would produce, as expected:
$ bee hardware
-------------------------------------------------------------------- hardware --
Hello, I'm a PC
OK
While construct
While construct will run the block in the do entry
while the Ruby condition in the while entry is true.
while: the condition to evaluate. This is a Ruby expression evaluated in the build context.do: the block to run while the condition is true.
For instance, to iterate five times, you could write:
- properties:
    i: 5

- target: loop
  script:
  - while: i > 0
    do:
    - print: :i
    - rb: i -= 1
Which would produce, as expected:
$ bee loop
------------------------------------------------------------------------ loop --
5
4
3
2
1
OK
For construct
For construct iterates on a list in the in entry,
putting values in a property which name is in the for entry
and running the block in the do entry for each value.
for: the name of the property which receives values of the iteration.in: a list on which to iterate. This can be a list or a ruby expression to evaluate in the context of the build to obtain the Enumerable on which to iterate.do: the block to run at each iteration.
For instance, to iterate on a list of files to create, you could write:
- target: for
  script:
  - for: file
    in:  [/tmp/foo, /tmp/bar]
    do:
    - print: "Creating #{file}..."
    - touch: :file
Which would write on console:
$ bee for
------------------------------------------------------------------------- for --
Creating /tmp/foo...
Touching 1 file(s)
Creating /tmp/bar...
Touching 1 file(s)
OK
In this previous example, the in entry was a list; in this
case, Bee iterates on this list. You can also put a Ruby expression (which
is a string) in the in entry. Bee will then evaluate this
expression, that must produce an Enumerable, and iterate on it. For instance,
to iterate five times, we could write (using a Ruby Range):
- target: for
  script:
  - for: i
    in:  (1..5)
    do:
    - print: :i
Which would output, as expected:
$ bee for
------------------------------------------------------------------------- for --
1
2
3
4
5
OK
To iterate on files in current directory, we could write:
- target: for
  script:
  - for: file
    in:  "Dir.glob('*')"
    do:
    - print: :file
Try construct
This last construct is for error management. It will run the block in the
try entry and catch any error that might occur. If an error
occurs, instead of stopping the build, it will run the block in the
catch entry.
For instance, to test if a given command exists in the system your building on, you might write:
- target: test
  script:
  - try:
    - "foo"
    catch:
    - print: "Command 'foo' not found"
Which would output, as expected:
$ bee test
------------------------------------------------------------------------ test --
Command 'foo' not found
OK
Getting help
Note that these constructs are not tasks, but you can get help about
them the same way you get help about tasks. For instance, typing
bee -k for will print on console help about the
for construct.
Dry running control structures
Control structures won't run in dry mode to avoid any side effect
evaluating Ruby expressions in if, while,
for or in entries. Thus, while running builds
in dry mode, control structure will be printed but tasks inside them won't
as you might expect.
Build context
The build context is the place where build properties and Ruby tasks are evaluated. It can be initialized with Ruby source files you put in the context key of the build entry of your build file.
Let's say you often use a greeting function. You can put it in a Ruby source file:
def say_hello(who)
  puts "Hello #{who}!"
end
You would load it in context with following build file:
- build: hello
  context: userguide-context.rb

- properties:
    who: "World"

- target: hello
  script:
  - rb: "say_hello(who)"
When this build file is loaded, it evaluates the Ruby source in context key in the build context. This will define function say_hello(who) in the context. Ruby task will then call this function with say_hello(who) expression.
You can think of the build context as the IRB workspace where context scripts would be loaded, properties defined and Ruby tasks evaluated.
Build inheritance
From release 0.5.0, Bee implements build inheritance. This feature enables to extend one or more build files in another one, overwriting properties and overloading targets. There can be no collision in properties and targets of inherited build files. Note that a build file can be marked as abstract which means that it must have been extended to run.
Properties
Build properties overwrite existing ones in parent build file. Thus, let's say you write this parent build file:
- properties:
    foo: "foo"
    bar: "#{foo}bar"

- target: test
  script:
  - print: :bar
Then, in a son build file, you write:
- build: son
  extends: userguide-property-parent.yml

- properties:
    foo: "bar"
We tell Bee that this script extends another one with extends key in build entry. Furthermore, property foo is redefined with new value bar.
Running extending build file will print:
$ bee test
------------------------------------------------------------------------ test --
barbar
OK
Targets
Targets are not replaced with those you define in extending build, but overloaded instead. This means that a target you define in an extending build file will be called, but this target can call same target defined in parent build using super in a script.
Let's consider this parent build file:
- target: test
  script:
  - print: "Target 'test' in parent"
We extend it with:
- build: test
  extends: userguide-target-parent.yml

- target: test
  script:
  - print: "Target 'test' in extending build"
  - super:
  - print: "Target 'test' again in extending build"
Running extending build will display:
$ bee test
------------------------------------------------------------------------ test --
Target 'test' in extending build
Target 'test' in parent
Target 'test' again in extending build
OK
Thus, calling super, you can patch existing target, adding tasks before and/or after running parent target. Not calling super, you can overwrite parent target altogether.
Default targets are appended with inheritance. Thus, if parent build file A defines target a as default target and B defines b as default target, then a build file that extends A and B would have a and b as default targets. Furthermore, if a given build file defines default targets, it overrides default ones in parents. Thus if previous build file that extends A and B defines its own default targets, it will ignore those defined by parents.
Behavior is similar for aliases : they are appended (for a given entry) and overridden by aliases in extending build file.
Inheritance Usage
Build inheritance is very handy when all your projects share a common structure and thus should have a common build file. You can write this common build file as a parent for children that will customize it in each project. This is a way to enforce a standard but add flexibility by specialization.
You can also use inheritance to assemble specialized build files to perform specific targets. For instance, you might write a build file to build your distribution archive, another one to manage your Python code, another one to manage your release (tagging project and sending emails), and so on. Your project would then assemble these parts extending them and behaving as a scheduler to perform the job.
Let's say you want to build all you projects in the 'build' directory and always write the same code to clean this directory. You might use the following file as a parent build file:
- build:       clean
  description: Parent build file to clean build directory
  abstract:    true

- properties:
    build:        "build"
    clean_dirs:   [:build]
    clean_files:  ["**/*~", "**/.#*", "**/.DS_Store"]

- target: clean
  description: Clean generated files
  script:
  - rmdir: :clean_dirs
  - rm:    :clean_files
You would use this parent in your build file writing:
- build:       test
  description: Build file using the one to clean build directory
  extends:     userguide-inheritance-parent.yml

- properties:
    build: "target"

- target:      compile
  depends:     clean
  description: Compile my source file
  script:
  - mkdir: :build
  - print: "Compiling my source file..."
  - touch: "#{build}/test.class"
This build file overwrites the build property with appropriate value target and uses the clean target to delete build directory and delete generated files.
To avoid name collisions between build files, you should use prefixes on property and target names. For instance, in a parent build file named python.yml, you could prefix the property and target names with py so that py_src would not collide with another named java_src for instance.
Editors integration
Here are quick hacks to use Bee in Emacs and Eclipse. Please feel free to contribute any improvement or any editor or IDE integration, it will be integrated or listed in next release.
Emacs
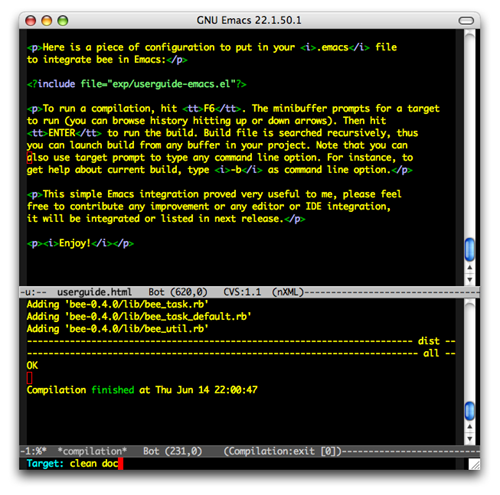
Here is a piece of configuration to put in your .emacs file to integrate Bee in Emacs:
;;******************************************************************************
;;*                                      BEE                                   *
;;******************************************************************************
;; Bee command name
(defvar bee-command "bee")
;; Bee options
(defvar bee-options "-r")
;; build using prompt target
(defun bee-build ()
  "Bee build prompting for target in the minibuffer."
  (interactive)
  ()
  (let
    ((target-name
      (read-from-minibuffer "Target: ")))
    (compile (concat bee-command " " bee-options " " target-name))))
;; set F6 as shortcut
(global-set-key [f6]     'bee-build)
;; set compilation window height to 15 lines
(setq compilation-window-height 15)
;; enable compilation window scrolling
(setq compilation-scroll-output 1)
To run a compilation, hit F6. The mini-buffer prompts for a target to run (you can browse history hitting up or down arrows). Then hit ENTER to run the build. Build file is searched recursively, thus you can launch build from any buffer in your project. Note that you can also use target prompt to type any command line option. For instance, to get help about current build, type -b as command line option.
Eclipse
A simple way to integrate Bee in Eclipse is to use External Tools menu. Click on External Tools... item in this menu and the following dialog box will appear:
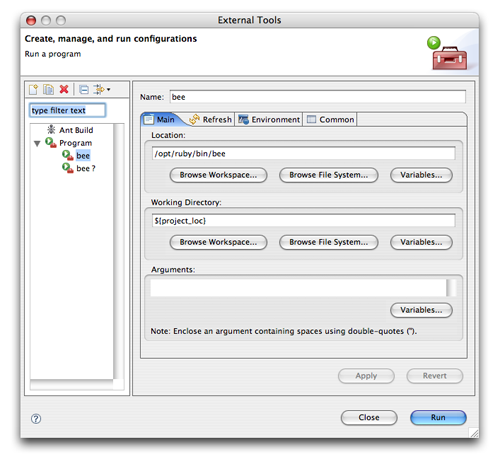
This configuration will launch Bee in the project home directory, which is a reasonable guess in much cases. You may have to adjust Bee location path according to your configuration.
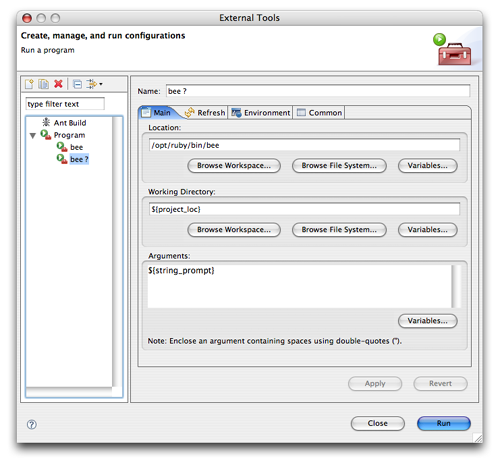
Following configuration will ask for the task to run, opening a pop-up where you can type it:
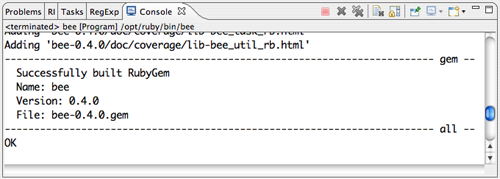
Running Bee this way will output build result in Console window:
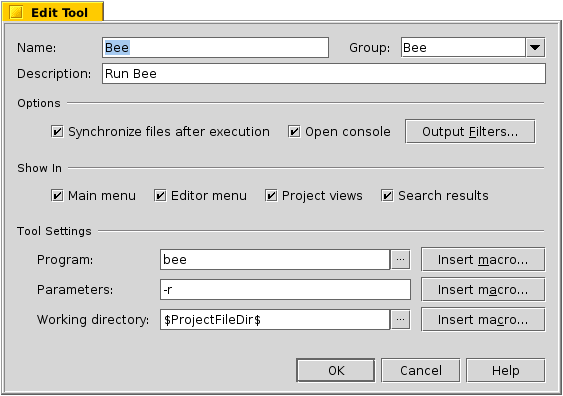
IntelliJ IDEA
Bee can be easily integrated in IDEA as an external tool. Open settings (in menu File/Settings) and add a new tool with the + button. You can add an entry to start Bee with default target with following settings:
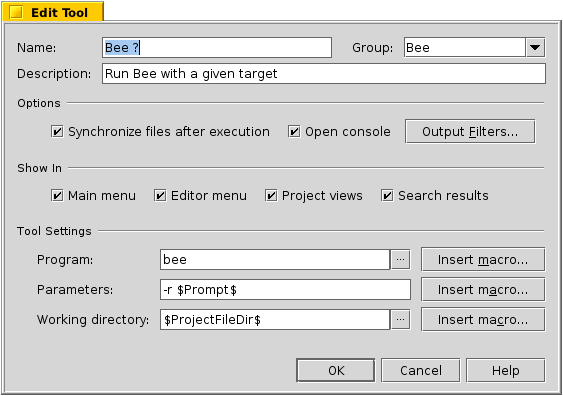
To add an entry that opens a dialog to prompt for target to run:
Enjoy!