
Extend CodeGuide features
This article presents CodeGuide extensions to launch JUnit tests, open a BeanShell console and Ant builds within this IDE.
The Code Guide IDE
CodeGuide (which evaluation version can be downloaded on Omnicore’s web site) is, in my humble opinion, the most efficient Java developement environment. It includes the most useful features of better Java tools (such as on the fly syntax checks, efficient code completion and a fast debugger), but without unnecessary fat, with makes it very fast (some of my colleagues though it was a native tool :o)
It is possible to extend CodeGuide features using external tools. CVS is integrated this way in the IDE for instance. In this article, I show how you can integrate JUnit, Beanshell and Ant as external tools.
JUnit integration
JUnit is a well known unit test framework. Using this tool, developing and running these tests is a piece of cake. A dedicated Ant task may also generate test reports. JUnit is an Open Source tool that you can download for free at http://www.junit.org. I have written an introduction to JUnit, in the May/June issue of Oracle Magazine.
The goal of this integration is to run a unit test, within CodeGuide, with a single click and see the result in the tools console.
Open the Tools/Configure Tools... menu. The following dialog box will
open:
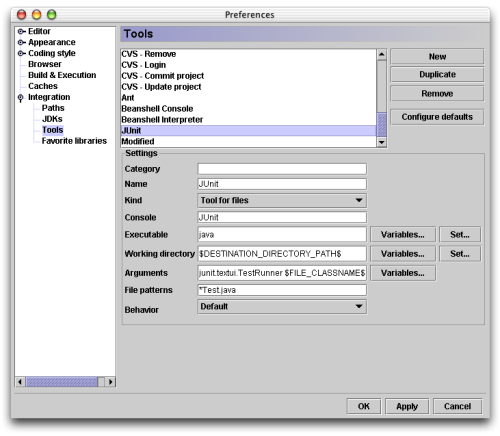
Click on the New button and fill fields with the following values:
| Champ | Valeur | Commentaire |
|---|---|---|
| Category | Leave this field empty (or the JUnit item would appear in a JUnit submenu, which is useless in this case). | |
| Name | JUnit | Logical |
| Kind | Tool for files | To launch a Java source file as a JUnit test |
| Console | JUnit | This is the name of the console which will display the result of the test |
| Executable | java | We launch the java command |
| Working directory | $DESTINATION_DIRECTORY_PATH$ | To launch JUnit in the compilation destination directory |
| Arguments | -cp $CLASSPATH$ junit.textui.TestRunner $FILE_CLASSNAME$ | So that the launcher runs the Java class generated from the edited Java source file |
| File pattern | *Test.java | We filter JUnit test cases |
| Behavior | Default | Why not… |
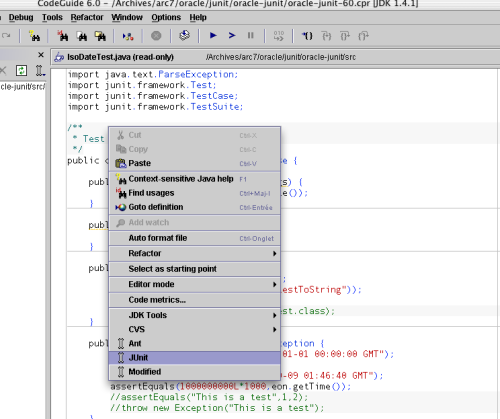
Close the tool configuration dialog box clicking the OK button. You
can now launch a test with a right click on a Java source file (in the
project pane or in the editor itself) and selecting the JUnit
item in the menu.
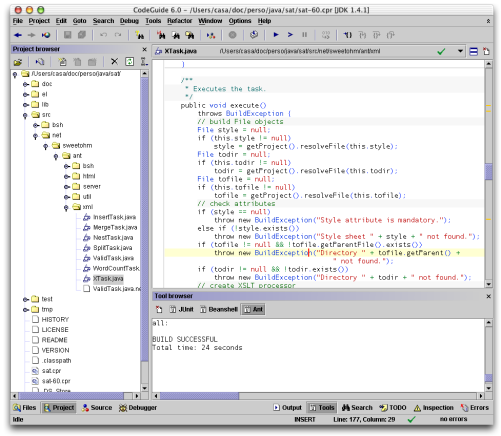
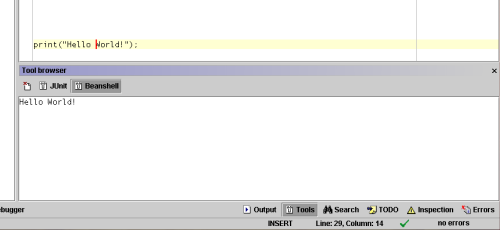
The test result appears in the tools console:
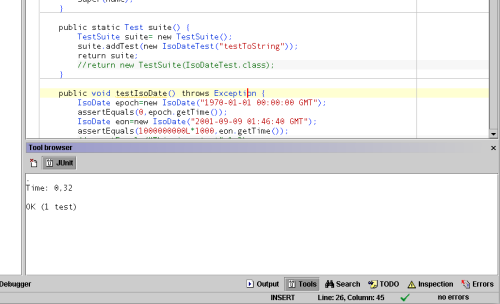
Note that you must click on the Build Project button in the tool bar
(or press key F9) before running a test, in order to build the
corresponding class file. Furthermore, it is possible to launch a unit
test using a main() method and changing the starting point of the
project, but it is more convenient using the JUnit launcher (especially
for web application where starting point is a bit weird).
Beanshell integration
Beanshell is a Java interpreter (with some scripting features). You can download it for free at http://www.beanshell.org. Integration in an IDE is useful when developing scripts or to test code fragments using the Beanshell interpreter as a scrap book.
Thus, the goal of this integration is to run scripts from the editor and launch a Beanshell console.
Beanshell interpreter
To integrate the script interpreter, open the tool configuration dialog box, click on the New button and fill the fields with the following values:
| Champ | Valeur | Commentaire |
|---|---|---|
| Category | Leave this field empty | |
| Name | Beanshell Interpreter | Logical |
| Kind | Tool for files | To interpret Beanshell sources |
| Console | Beanshell | The name of this concole |
| Executable | java | We run the java command |
| Working directory | $PARENT_DIRECTORY_PATH$ | We run a script within its directory |
| Arguments | -cp /opt/java/bsh/lib/bsh-1.2b7.jar:$CLASSPATH$ bsh.Interpreter $FILE_PATH$ | We include the Beanshell’s jar file in the CLASSPATH (change this path for your Beanshell installation directory) and we add the project’s CLASSPATH, we pass the file to interpret as parameter |
| File pattern | *.bsh | To select Beanshell source files |
| Behavior | Default | Why not… |
We can now run the interpreter with a single right click on a script source and see the output in the Beanshell console.
Beanshell console
To run the interpreter in a console, open the tool configuration dialog box, click on the New button, and fill the fields with the following values:
| Champ | Valeur | Commentaire |
|---|---|---|
| Category | Leave this field empty | |
| Name | Beanshell Console | Logical |
| Kind | Tool in menu | To lauch the interpreter from the Tools menu |
| Console | Beanshell | The name of the console |
| Executable | java | We run the Java virtual machine |
| Working directory | Leave empty (except if you want to work in a given directory) | |
| Arguments | -cp /opt/java/bsh/lib/bsh-1.2b7.jar:$CLASSPATH$ bsh.Interpreter | We add the Beanshell’s jar file to the CLASSPATH (replace with the path for your Beanshell installation directory) and we append the CLASSPATH of the project. No file is passed on the command line so that the interpreter runs the user’s inputs. |
| File pattern | Leave empty, has no meaning in this context | |
| Behavior | Default | Why not… |
To open the Beanshell console, select the
Tools/Beanshell Console item of the menu, the following window
appears:
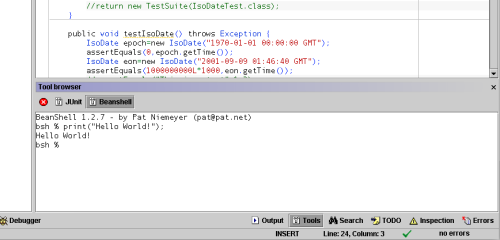
We can evaluate Java expressions and see the result in the console. This is an handy way to quickly test a piece of code and paste it in the editor.
Ant integration
Ant is a build tool (that may be compared to make) dedicated to build Java projects. I have written a series of articles on Ant in the November/December and January/February issues of Oracle Magazine. Ant is integrated to CodeGuide out of the box, but if you chose ant builds, on the fly code generation is not running, which is a key feature of CodeGuide.
The goal of this integration is to launch an Ant build from within the interface using on the fly code compilation.
Open the tool configuration dialog box and fill the fields as following:
| Champ | Valeur | Commentaire |
|---|---|---|
| Category | Leave this field empty | |
| Name | Ant | No comment |
| Kind | Tool for files | So that Ant looks in parents directories of the file you click (this works great if the build file is in the root directory of the project) |
| Console | Ant | The name of the console |
| Executable | ant | We run Ant |
| Working directory | $PARENT_DIRECTORY_PATH$ | We run Ant in the directory of the file |
| Arguments | -find build.xml $USER_ARGUMENTS$ | We ask Ant to look for a build file named build.xml recursively in parent directories. The value $USER_ARGUMENTS$ gives the user a chance to type an Ant target to run |
| File pattern | * | We can click on any file to launch an Ant build (useful to transform XML files using Ant builds for instance) |
| Behavior | Default | Why not… |
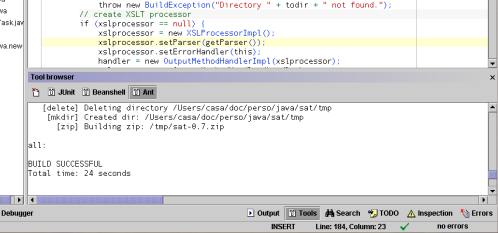
You can now open a file context menu (with a right click) and launch the build choosing the Ant item. I genrally choose Use internal incremental compiler in my projects preferences and launch Ant builds when necessary (to generate a jar file for instance).
Conclusion
Even if CodeGuide’s customization can’t compete with Emacs, it is very useful to integrate in this IDE your favorite tools. We could wonder what is missing to CodeGuide (when you’ll have tested classes Hot Swap or Tomcat integration). Maybe a plugin API so that any developer could send Omnicore their own extensions. Please Omnicore developers, think about that!
Thanks Frédéric for his corrections!